News
Phased Array Ultrasonic Testing (PAUT)
Phased Array Ultrasonic Testing is an advanced method of ultrasonic testing used in industrial non-destructive testing. Phased Array probes are made up of several piezoelectric crystals that transmit and receive pulses individually. These multi-element probes can be fired independently of each other and if carried out in sequence, the interference between each element can cause the beam to bend. By controlling the timing between each set of firings, the angle of the beam can be manipulated continuously producing a beam which can swing through a section of material. This means that from a single position, a whole volume of material can be examined with only the beam moving and not the probe.
Difference Between PAUT Conventional Ultrasonic Testing
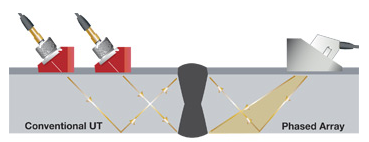
A conventional ultrasonic probe consists of a single piezoelectric element, whereas a Phased Array probe has multiple piezoelectric elements contained within the probe. Each piezoelectric element is independently controlled through the electronic timing of the pulses, to synthesize these individual wavelets so they can then be directed and steered, to control the resulting ultrasonic soundwave beam. Phased Array method makes it possible to change the angle of incidence and the position of focusing of the ultrasonic beam for a single probe, rather than having to use multiple probes for conventional ultrasonics for a specific application.

Figure 1. beam paths for conventional UT and Phased Array
Advantages of Phased Array
PAUT has many advantages over single element conventional ultrasonic probes. The probes are easier to operate and more efficient, as their multi-elements can capture hundreds of signals at once – providing more flexibility and real-time imaging capabilities. Flaw detection can also be increased when used in conjunction with simulation, whilst also improving data recording and traceability. These results from the simulation can be compared to the inspection data, to provide confirmation of potential defects and reduces the number of false calls. As mentioned previously, due to the ability to adjust the focal point of the ultrasonic beam, inspection speeds are greatly increased, maximising the capabilities of each inspection. Additionally, depth focusing enables measurements to be carried out at various depths faster, providing more efficient and reliable results, compared to that of a conventional probe.
Application of Phased Array
Phased Arrays can perform a range of inspection and measurement applications in industrial Non-Destructive Testing. Common applications are to detect flaws in welds, voids, and corrosion, in addition to inspecting interfaces and joints, measuring material and coating thickness, and identifying changes in material properties.
What TEXO can offer
Bolt Inspection
Bolted connections are critical components associated with cranes, bridges, vessel flanges and other onshore and offshore structures. In-service factors such as thermal stress, external loads, and vibration (where bolts are subjected to viable stresses, separation, or distortion), can lead to cracks and corrosion. If not monitored periodically, this might result in failure and disastrous damage.
Common methods of inspecting bolts are visual inspection, followed by fluorescent Magnetic Particle Inspection (MPI) or Dye Penetrant Inspection (DPI). However, this is not cost affective as the bolts have to be removed individually leading to potential long periods of downtime. Conventional Ultrasonic Testing is also used, although results are operator dependent, and interpretation of results are difficult due to signal reflection for the bolt threads and geometry where mode convention occurs.
Phased Array inspection can be performed in-situ, without removing the bolts, therefore considerably reducing downtime and costs. The Probability of Detection (POD) is considerably higher with PAUT, compared to conventional UT, with data recording allowing for further review and analyse.
Weld Inspection
PAUT reduces inspection time by covering multiple angle inspection data from a single scan pass, from either side of a weld. By constructing accurate scan plans for specific weld configurations, defects are detected, characterised, and sized accordingly. The software analysis allows welds to be scanned from multiple directions optimising inspection.
Weld applications include:
- Complexed bevel welds
- Fusion faces
- Pipe to pipe and pipe to fitted joints
- T-joints
Corrosion Mapping
Due to the high sensitivity of Phased Array beams, this enables the detection of reflected and diffracted signals, enhancing defect characterisation. Screen displays allows for interpretation of rapid scanned data that can identify sub-surface damage and material losses.
Accurate defect locations can be recorded and monitored for future repair, reducing shutdowns or prolonged maintenance periods. The mapping data software can identify the position corrosion or pit. It displays the average thickness and minimum thickness against the material thickness threshold, and the proportion of this area of corrosion can be viewed through either A-scan, S-scan, or C-scans.
Flange Face Inspection
This technique is used to detect crevice corrosion around the sealed surface of flanges found on pipes, vessels, or other components. When exposed to corrosive fluids and challenging environments, damage can occur over time, leading to potential failure. The neck and body of the material can also be measured for any material losses. PAUT can inspect in-service flanges without having to strip them apart and reduce inspection time and costs.
If you think your business could benefit from our expertise, please contact us to find out more: Info@texo.co.uk
Reference
Figure 1. (Olympus.com) https://www.olympus-ims.com/en/ndt-tutorials/intro/advantages/